 Loading... Please wait...
- Home
- Shop
- Game List
-
Archive
- 1TB (v1.0)
- 1TB (v2.0)
- 1TB (v3.0) 12MB*
- 1.5TB (v1.0)
- 1.5TB (v2.0)
- 1.5TB (v3.0) 15MB*
- 2TB (v1.0)
- 2TB (v2.0)
- 2TB (v3.0) 29MB*
- 3TB (v1.0)
- 3TB (v2.0)
- 3TB (v3.0) 30MB*
- 4TB (v1.0)
- 4TB (v2.0)
- 4TB (v3.0) 31MB*
- 5TB (v1.0)
- 5TB (v2.0)
- 5TB (v3.0) 32MB*
- 6TB (v1.0)
- 6TB (v2.0)
- 6TB (v3.0) 33MB*
- 8TB-01 (v1.0)
- 8TB-01 (v2.0)
- 8TB-01 (v3.0) 43MB*
- 8TB-02 (v1.0)
- 8TB-02 (v2.0)
- 8TB-02 (v3.0) 32MB*
- 16TB (v1.0)
- 16TB (v2.0)
- 16TB (v3.0) 76MB*
- Systems & Emulators
- Core Hyperspin Files
- Core Hyperspin Files 38MB*
- Emulators
- Emulators 4MB
- Hyperspin Media
- Hyperspin Media 26MB*
- RocketLauncher
- RocketLauncher 4MB
- Hyperspin Drive GameList
- store
- JAMMA Drive Games Family 3500 Game List
- MAME Database
- MAME Database 2
-
FAQ
- What is HyperSpin?
- Is Hyperspin worth the HYPE?
- Why buy a Preconfigured Hyperspin Hard Drive?
- Do we take Cryptocurrencies as a form of payment?
- What operating systems are compatible with our Preconfigured Hyperspin Hard Drive?
- How long does it take to install our Preconfigured Hyperspin Hard Drive and start playing games?
- What Hyperspin version do we run on our Arcade Gaming PC system and pre-configured hyperspin hard drive?
- What Systems, Emulators and Games are on each of our Preconfigured Hyperspin Hard Drive?
- What Gaming PC Systems are compatible with our Preconfigured Hyperspin Hard Drive?
- See a LIVE demo and test drive hyperspin for yourself
- How to Choose Between an Internal Hyperspin Hard Drive and an External Hyperspin Hard Drive
- What DRIVE Setup Requirements are needed for each of our Preconfigured Hyperspin Hard Drive?
- What's the difference between our 1TB vs. 2TB vs. 4TB vs 8TB vs 16TB Hyperspin Hard Drive?
- Is a controller required to play games on our Preconfigured Hyperspin Hard Drive?
- Can I add more systems, emulators and games to your Preconfigured Hyperspin Hard Drive?
- Why it is better with a 16TB HDD Hyperspin RAID 0 Enclosure vs. 2x8TB Drives?
- Can I start with a smaller Hyperspin drive today and upgrade to a bigger Hyperspin drive later?
- What is RocketLauncher?
-
Tech Talk
- How to fix ps2 (playstation 2) controls so the left thumbstick and the directional buttons are switched
- Emulators-Firmware-BIOS
- How to navigate hyperspin wheels menu to play games
- Hyperspin xpadder default button for xbox 360
- Ipac Designations
- Joytokey for xinmo pinout
- Setting up Ipac for 2 Players
- Setting up Ipac for Player 3 and Player 4
- X-Arcade default buttons and hyperspin controls
- Xinmo Button Number Designations
- Xinmo Button Number Designations Player 3 and Player 4
- xpadder 360 wireless controller Player2
- RocketLauncher Keymapper
- An Introduction to MAME
- Using MAME
- MAME ROMs and Sets
- MAME Default Keys
- Difference between Arcade Classics and MAME?
- Hyperspin Live Demo
- Pre-configured Hyperspin Hard Drive
- HyperSpin - Believe the Hype?
- Hyperspin compatible with Windows XP?
- How To Install HyperSpin on Nvidia Shield
- Info
- How to Buy
- Contact Us
Categories
Popular Brands
- Preconfigured Hyperspin Hard Disk External with Microsoft Xbox 360 Wireless Controller & Receiver
- Preconfigured Hyperspin Hard Disk Internal with Microsoft Xbox 360 Wireless Controller & Receiver
- Preconfigured Hyperspin Hard Drive External
- Preconfigured Hyperspin Hard Drive Internal
- 16TB Preconfigured Hyperspin Hard Drive External RAID 0 Enclosure
- 16TB Preconfigured Hyperspin Hard Drive External RAID 0 Enclosure with Wireless Controller & Receiver
- 1TB Hyperspin Drive with Controller
- 3TB Hyperspin Systems Drive
- 8TB Hyperspin Drive with Xbox Controller
- JAMMA Drive
RocketLauncher Keymapper
ONLY Xpadder (2012 versions) and JoyToKey (v5+) and Autohotkey scripts are supported options for keymapper functionality. Will not work with JoyToKey v3 or below. Even though Keymapper supports 16 controllers, this only for Direct Input and not XInput since XInput is limited to 4 controllers. (Xinput is typically used in software that natively supports the 360 controller.)
Keymappers
Xpadder
Xpadder costs $10 and can be downloaded from xpadder.com. This is the recommended keymapper of choice. To set it up, run it once you have downloaded it. Make note of where you have installed it to since you will need to know that when you use it with RocketLauncher. Once you have installed it, you will need to make a layout for your controller. 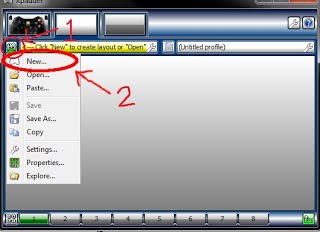
Images to replace the pink background can be found at xpadder.com/gcdb. An image of your controller will be useful for making your profiles. To grab an image from the xpadder database right click on the image you want and choose copy image. You can then use the paste button in xpadder. Now you will need to add your analog sticks, dpad, buttons and triggers using the on screen instructions Once you've finished adding all the controls for your controller you will need to save your layout. I suggest saving it as the same name as your controller (the default name).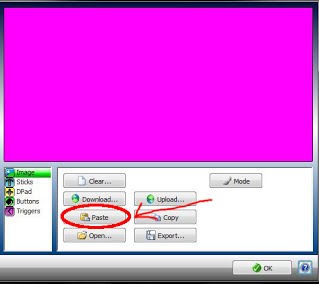
You will now need to create a profile. Profiles are what RocketLauncher uses to tell xpadder how to map your controller. You can start by making a profile by clicking on the text page button first and then choosing New. 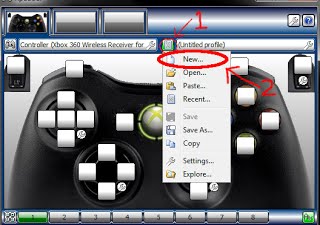
The next step is to map your buttons to a keyboard key. This is simple and easy to do. You will need to click on one of the white boxes that represent your buttons on your controller. This will open a virtual keyboard. Choose your key. When you are finished mapping your buttons you can now save your profile. To use with RocketLauncher you will need to name it and place it in the correct folder path as described in the profiles section below.
AutoHotKey
AutoHotKey is the only free keymapper that is supported by RocketLauncher. The downside to using ahk as your keymapper is that RocketLauncher only has basic support for it and it does not support Front End or RocketLauncher Menu profiles or any other kind of in game remapping done by Pause. There is no download required to use it, but if you wish to test your key maps without starting RocketLauncher you can download autohotkey from autohotkey.com. To create an ahk profile, you will first need to create an ahk file. You can do this by creating a new Text Document and renaming the file extension from .txt to .ahk. Now open your new ahk file with your favorite text editor and start adding your remaps. You can find more info about how to remap via ahk here. A list of support ahk keys can be found here. Information on how to remap keys and buttons can be found here and more information on how to remap joysticks and controllers can be found here. Save the ahk file with the remaps as one of the profile names specified in the profile section below. As an example, let's say you want to remap a to b and c to d using ahk for the rom "Mario" for Mame. You would create a "Mario.ahk" in "Keymapper Profiles\Mame\" and in it you would find the following remaps:
Code:
a::b
c::d
JoyToKey
JoyToKey is shareware and a license for a fully functioning version will cost $7, but a functioning trial version with few limitations can be downloaded for free. JoyToKey enables you to control many softwares (e.g. web games, browsers, office applications or even Windows itself) by using your favorite windows joystick. Whenever you press joystick buttons and sticks, JoyToKey will emulate keyboard strokes or mouse inputs based on joystick input so that the target application works as if you used a real keyboard or mouse. You can create multiple configuration files to switch across different key/mouse assignments. It also supports the automatic association with target applications so that the config file will switch automatically when the target application changes. You can download the latest version of JoyToKey from their website www-en.jtksoft.net. JoyToKey is different from the other keymappers in the sense that the others require you to have a profile per player, but JoyToKey only requires you to have one cfg profile for all the players. In other words the multiplayer tag won't work on your profiles since the tags are inherent in joytokey's profiles. The way to differentiate between player 1 and player 2 is inside the joytokey menu and at the top you will see the tabs Joystick 1 and Joystick 2. Joystick 1 = Player 1 and Joystick 2 = Player 2. JoyToKey supports up to 16 of these tabs. Be sure to change your settings so that you Start JoyToKey in a minimized mode and Hide icon from taskbar when minimized. A how to guide for basic usage and advance usage of joytokey is provided on their website www-en.jtksoft.net.
Profiles
Profile Types
Game Specific
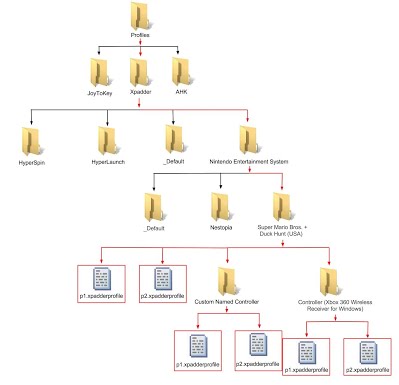
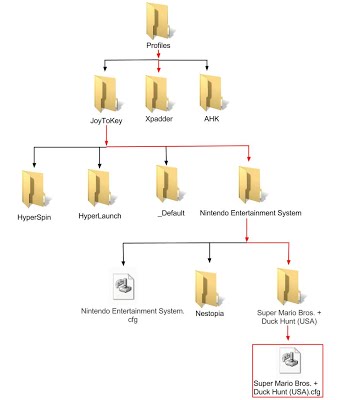
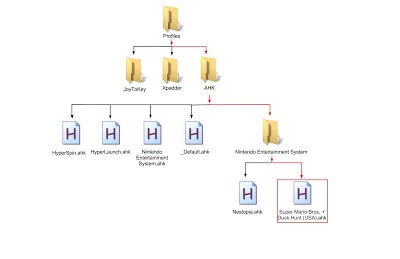
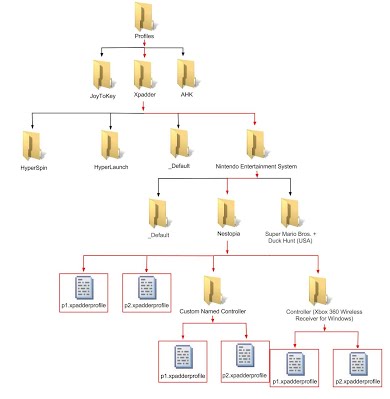
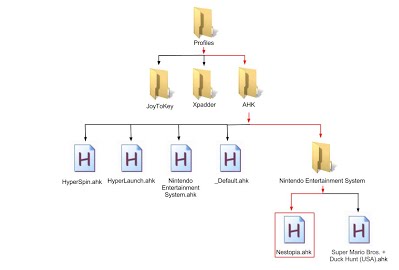
The Game Specific profile also known as the rom profile is the first profile RocketLauncher looks for when loading your keymapper profiles. A game specific profile is useful if you need different controls per game. Below are examples of how to make a game specific profile for the different keymappers for the game "Super Mario Bros. + Duck Hunt (USA)" for the system "Nintendo Entertainment System".
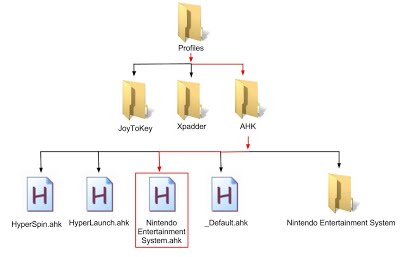
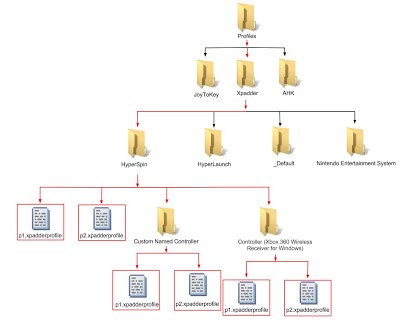
Xpadder
- Code:
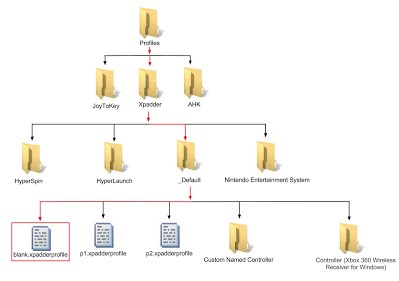
- RocketLauncher\Profiles\%keymapper%\%systemName%\%romName%\p1.xpadderprofile
- RocketLauncher\Profiles\%keymapper%\%systemName%\%romName%\%controllerName%\p1.xpadderprofile
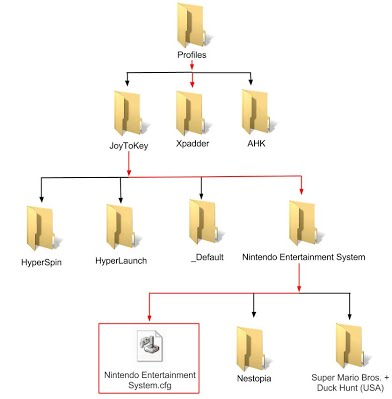
JoyToKey
- Code:
- RocketLauncher\Profiles\%keymapper%\%systemName%\%romName%\%romName%.cfg
AutoHotKey
- Code:
- RocketLauncher\Profiles\%keymapper%\%systemName%\%romName%.ahk
Emulator
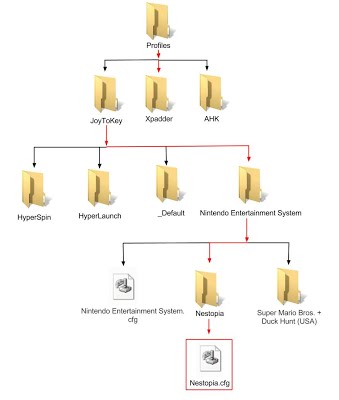
The Emulator profile is the same name you give to your emulator when setting it up through RocketLauncherUI. This is the same name you gave when you were asked to give a name and a path to your emulator. This profile is the second in the list of what RocketLauncher looks for when loading profiles for your game. This profile is useful if you use two different types of emulators for the same system and would like a profile according to those emulators inside that system (ex. Nestopia and Jnes). If you want a emulator specific profile for the emulator "Nestopia" and your system name is "Nintendo Entertainment System" it would be:
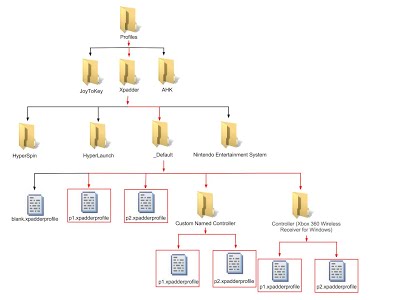
Xpadder
- Code:
- RocketLauncher\Profiles\%keymapper%\%systemName%\%emulator%\p1.xpadderprofile
- RocketLauncher\Profiles\%keymapper%\%systemName%\%emulator%\%controllerName%\p1.xpadderprofile
JoyToKey
- Code:
- RocketLauncher\Profiles\%keymapper%\%systemName%\%emulator%\%emulator%.cfg
AutoHotKey
- Code:
- RocketLauncher\Profiles\%keymapper%\%systemName%\%emulator%.ahk
System
The System profile is named after your system and is the third in the list of the profile types that RocketLauncher looks for when starting your game. The profile will only be loaded if you are using that system. If you want to make a system specific profile for "Nintendo Entertainment System" it would be:
Xpadder
- Code:
- RocketLauncher\Profiles\%keymapper%\%systemName%\_Default\p1.xpadderprofile
- RocketLauncher\Profiles\%keymapper%\%systemName%\_Default\%controllerName%\p1.xpadderprofile

JoyToKey
- Code:
- RocketLauncher\Profiles\%keymapper%\%systemName%\%systemName%.cfg
AutoHotKey
- Code:
- RocketLauncher\Profiles\%keymapper%\%systemName%.ahk
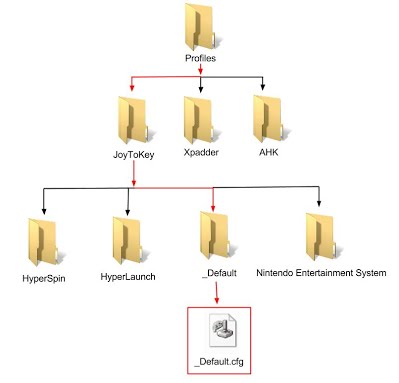
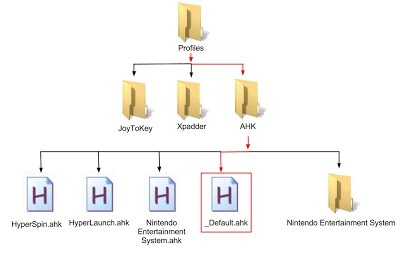
Default
The Default profile is the fourth on the list of profiles RocketLauncher looks for when starting your game. This is the only profile that is used for all systems when loading. Please note that it is not used when exiting your game or loading a RocketLauncher menu, but it will always be used if a game, emulator or system profile could not be found when starting your game. Below is how to name and where to put a default profile for the different keymappers.
Xpadder
- Code:
- RocketLauncher\Profiles\%keymapper%\_Default\p1.xpadderprofile
- RocketLauncher\Profiles\%keymapper%\_Default\%controllerName%\p1.xpadderprofile
JoyToKey
- Code:
- RocketLauncher\Profiles\%keymapper%\_Default\_Default.cfg
AutoHotKey
- Code:
- RocketLauncher\Profiles\%keymapper%\_Default.ahk
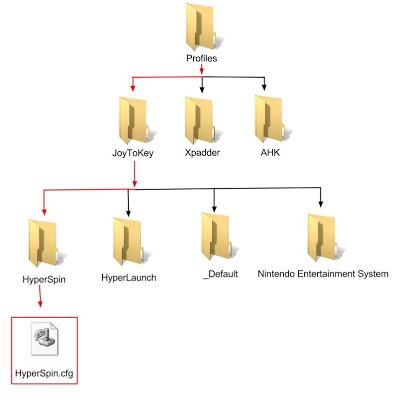
Front End
The Front End profile is only used when you exit your game and return to your front end. The name for your Front End Profile is set by the key "Keymapper_FrontEnd_Profile_Name." If you want to use this profile you will need to create it like you would a system profile. If you have RocketLauncher v3.0.1.1 or later you will need to set the value for the key Keymapper_FrontEnd_Profile to match your keymapper of choice; valid options are xpadder, joytokey, ahk, and false (default value that turns front end profile loading off). The default front end name is HyperSpin and this name will be used in the below examples. This profile is supported for AHK, but you must set Keymapper_AHK_Enabled to equal external.
Xpadder
- Code:
- RocketLauncher\Profiles\%keymapper%\%FrontEndName%\p1.xpadderprofile
- RocketLauncher\Profiles\%keymapper%\%FrontEndName%\%controllerName%\p1.xpadderprofile
JoyToKey
- Code:
- RocketLauncher\Profiles\%keymapper%\%FrontEndName%\%FrontEndName%.cfg
AutoHotKey*
- Code:
- RocketLauncher\Profiles\%keymapper%\%FrontEndName%.ahk
*Keymapper_AHK_Enabled = external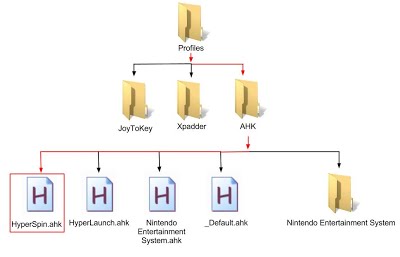
RocketLauncher Menu
The RocketLauncher profile is used for the RocketLauncher menus that use the navigation keys. Features that currently support this profile are MultiGame and Pause. This profile is useful if you want to use joysticks for these features since RocketLauncher does not recognize pov hats or axis controls on a joystick for navigation through the menus. You can disable and enable this profile with the "Keymapper_RocketLauncher_Profile_Enabled" key by setting it to true or false. If it is true, RocketLauncher will load your menu profiles when entering a menu and restore your game profiles when exiting a menu. If it is false, RocketLauncher will not change your keymappings and they will stay the same as they were before you open a RocketLauncher menu. So if you want to use this profile you will need to create a profile like you would for a system, except this system is always named RocketLauncher. After RocketLauncher v3.0.1.0 this profile is now supported for AHK, but you must set Keymapper_AHK_Enabled to equal external.
Xpadder
- Code:
- RocketLauncher\Profiles\%keymapper%\RocketLauncher\p1.xpadderprofile
- RocketLauncher\Profiles\%keymapper%\RocketLauncher\%controllerName%\p1.xpadderprofile
File:Keymapper profile xpadder RocketLauncher.jpg
JoyToKey
- Code:
- RocketLauncher\Profiles\%keymapper%\RocketLauncher\RocketLauncher.cfg
File:Keymapper profile joytokey RocketLauncher.jpg
AutoHotKey*
- Code:
- RocketLauncher\Profiles\%keymapper%\RocketLauncher.ahk
*Keymapper_AHK_Enabled = external
File:Keymapper profile ahk front RocketLauncher.jpg.1379464584168.jpg
Blank
The blank profile is supposed to be an empty profile. It has no remappings in it at all. This is meant as a place filler for controllers that have no remaps made. Example, if you have two different types of controllers connected, and the controller you don't want to use occupies the 2nd player number (id 2) in Pause, but in Xpadder it might occupy the first tab. The controller that is first player (id 1) in Pause might occupy the second tab in xpadder. Due to the way xpadder handles the profiles passed to it in the command line, this blank profile is needed as a filler for the unwanted controllers that show up in the tabs before the preferred controller. Xpadder loads profiles through the command line in the order of the tabs displayed, not the order used by Pause (Direct Input order), or the order the controllers were connected in.
There should only be one blank profile for Xpadder. This profile is always loaded last if no other profile is found, anytime RocketLauncher is loading your profiles that you use for playing your games, returning you to your front end, or opening a RocketLauncher menu. To make one, you need to name it "blank" and place it in the same directory as the default profile. This profile is only supported and required by xpadder.
Xpadder
- Code:
- RocketLauncher\Profiles\%keymapper%\_Default\blank.xpadderprofile
Preferred Conrollers
This is a list defining which controllers you would like to use. This list tells RocketLauncher to always order your connected controllers in the same order as defined by this list. Custom names are allowed in this list. If you have more than one instance of a name on the list, the order of the first name found in the list is used. If you have more than one controller with the same default or custom name, the order in which they were connected will be used. This is useful if you want want a certain type of controller to have priority over another when playing a certain game or system. This list can be specified globally in the Global RocketLauncher.ini file, on a system level in the SystemName\RocketLauncher.ini file and on a per game basis in the SystemName\Games JoyIDs.ini file. The global and system keys are named "JoyIDs_Preferred_Controllers" and are under the section "Keymapper." The "JoyIDs_Preferred_Controllers" key in "Games JoyIDs.ini" is under a section named after your game. Here are some examples of how this list works. In the example I will be using controllers with three different names: x360, ps3 and logitech. Custom Names are enabled and "Custom_Joy_Names = x360|favorites/logitech|favorites."
JoyIDs_Preferred_Controllers = controller A|controller B|controller C
(# of Controllers) : controller A = 1, controller B = 1, controller C = 1
p# = 1. controller A
p# = 2. controller B
p# = 3. controller C
JoyIDs_Preferred_Controllers = ps3|x360|logitech
(# of Controllers) : ps3 = 1, x360 = 1, logitech = 1
1. ps3
2. x360
3. logitech
JoyIDs_Preferred_Controllers = ps3|x360|logitech
(# of Controllers) : ps3 = 2, x360 = 1, logitech = 1
1. ps3
2. ps3
3. x360
4. logitech
JoyIDs_Preferred_Controllers = ps3|x360|logitech
(# of Controllers) : ps3 = 1, x360 = 2, logitech = 1
1. ps3
2. x360
3. x360
4. logitech
JoyIDs_Preferred_Controllers = logitech|ps3|x360
(# of Controllers) : ps3 = 1, x360 = 2, logitech = 1
1. logitech
2. ps3
3. x360
4. x360
JoyIDs_Preferred_Controllers = ps3|favorites
(# of Controllers) : ps3 = 1, x360 = 1, logitech = 1
1. ps3
2. x360 or lgitech (depends on order found in before (what order were they turned on))
3. x360 or logitech (depends on order found in before (what order were they turned on))
JoyIDs_Preferred_Controllers = favorites|ps3
(# of Controllers) : ps3 = 1, x360 = 1, logitech = 1
1. x360 or logitech (depends on order found in before (what order were they turned on))
2. x360 or logitech (depends on order found in before (what order were they turned on))
3. ps3
JoyIDs_Preferred_Controllers = favorites|ps3|x360
(# of Controllers) : ps3 = 1, x360 = 1, logitech = 1
1. logitech
2. ps3
3. x360
JoyIDs_Preferred_Controllers = x360|favorites|ps3
(# of Controllers) : ps3 = 1, x360 = 1, logitech = 1
1. x360
2. logitech
3. ps3
JoyIDs_Preferred_Controllers = x360|ps3|x360
(# of Controllers) : ps3 = 1, x360 = 2, logitech = 1
1. x360
2. x360
3. ps3
4. logitech
Custom Names
Custom Names are useful for grouping your controllers or giving them a shorter name. The limitation to this feature is that you can have only one custom joystick name assigned to a default windows joystick name. Also if you use both the default name and custom name in naming your profiles or for your Preferred Controllers list the default name will always be used since it is inherently more specific. Some examples of it being used are to reduce long controller names to something simple like "Controller (Xbox 360 Wireless Receiver for Windows)" to just "x360." or for grouping your controllers like "Controller (Xbox 360 Wireless Receiver for Windows)" to "xbox 360 controller" and "Controller (Afterglow Gamepad for Xbox 360)" to "xbox 360 controller." You will need to enable this feature first by setting the" Custom_Joy_Names_Enabled = true" and defining your custom joystick names list in the "Custom_Joy_Names" key.
Custom_Joy_Names_Enabled = true
Custom_Joy_Names = Controller (Xbox 360 Wireless Receiver for Windows)|xbox 360 controller\Controller (Afterglow Gamepad for Xbox 360)|xbox 360 controller\Default Windows Name|Custom Name
Keymapper Ini Settings
Settings\RocketLauncher.ini
[Settings]
| Key | Default Value | Description |
| Profiles_Path | .\Profiles | The path to where all your profiles for your different programs like keymappers or VJoy are stored. You will need to create a folder with the same name as your program and place your profiles in accordance with the RocketLauncher format in that program folder. So if your keymapper is Xpadder and you used the default profile path, the path to your profiles would then be %Profiles_Path%\Xpadder or if the profiles are for VJoy your profiles would then be in %Profiles_Path%\VJoy |
[Keymapper]
| Key | Default Value | Description |
| Xpadder_Path | ..\Utilities\Xpadder\xpadder.exe | Path to your Xpadder.exe (2012 or newer). This path is only necessary if you use Xpadder as your keymapper. You can buy Xpadder at www.xpadder.com. |
| JoyToKey_Path | ..\Utilities\JoyToKey\JoyToKey.exe | Path to your JoyToKey.exe (v4 or newer). This path is only necessary if you use JoyToKey as your keymapper. You can buy JoyToKey at www-en.jtksoft.net. |
| Keymapper_FrontEnd_Profile_Name | HyperSpin | Prefix of your Front End profile. It is used for the profile that is loaded when you exit your game. |
| Keymapper_FrontEnd_Profile | false | The keymapper you want to use when returning back to your Front End. Keeping this separate allows you to use any keymapper you want within your Front End, and are not tied to the one you use for your application. Choices are:
|
| Keymapper_RocketLauncher_Profile_Enabled | false | If true it will enable the RocketLauncher menu profile for the RocketLauncher windows (ex. Pause, Multigame, any future additions). This would let you use the RocketLauncher's navigation keys for your joystick. |
| Custom_Joy_Names_Enabled | false | If true, enables custom joystick names and groupings for your controllers |
| Custom_Joy_Names | A list of custom names being associated with a default control panel joystick name. A custom name can be used more than once. A default joystick name can only have one custom name assigned to it. |
Settings\Global RocketLauncher.ini & Settings\%SystemName%\RocketLauncher.ini
[Keymapper]
| Key | Default Value | Description |
| Keymapper_Enabled | false | Enables/Disables Keymapper support. |
| Keymapper | The 3rd-party keymapper you want to use. Default is blank, but choices are xpadder or joytokey. | |
| Keymapper_AHK_Method | false | The RocketLauncher Keymapper method, which uses autohotkey remaps. Choices are internal and external.
|
| JoyIDs_Enabled | false | Enables/Disables JoyIDs support |
| JoyIDs_Preferred_Controllers | A list defining which controllers you would like to use. This tells RocketLauncher to always order your connected controllers in the same order as defined by this list. Custom names are allowed in this list. If you have more than one instance of a name on the list, the order of the first name found in the list is used. If you have more than one controller with the same default or custom name, the order in which they were connected will be used. This is useful if you want want a certain type of controller to have priority over another when playing a certain game or system. |
Settings\%SystemName%\Games Joyids.ini
[%RomName%]
| Key | Default Value | Description |
| JoyIDs_Preferred_Controllers | A per game list defining which controllers you would like to use. This list will only be used for the game you specify inthe section header. If you have set a preferred controller list for a game in the past, but want to use the global or system list just delete the ini key or set it to ERROR.What this list does is that it tells RocketLauncher to always order your connected controllers in the same order as defined by this list. Custom names are allowed in this list. If you have more than one instance of a name on the list, the order of the first name found in the list is used. If you have more than one controller with the same default or custom name, the order in which they were connected will be used. This is useful if you want want a certain type of controller to have priority over another when playing a certain game or system. |
Tips & Tricks
1. My controllers have the same default controller name can I can change this?
Yes, you can if they have a different VID_****&PID_*****. You can change it in the registry in case you don't like the generic name of your controller or if you have two different controllers with the same name. Change it under HKEY_CURRENT_USER\System\CurrentControlSet\Control\MediaProperties\PrivateProperties\Joystick\OEM\VID_****&PID_****\OEMName and then change it under
HKEY_LOCAL_MACHINE\SYSTEM\CurrentControlSet\Control\MediaProperties\PrivateProperties\Joystick\OEM\VID_****&PID_****\OEMName.
![]()